Showing posts with label misa. Show all posts

Thursday, 2 October 2014

31C2014 Day 23 - Inspired by a Movie

Hello!

yeah, yeah, yeah - not even close.
To be fair I did, and posted this on Instagram on the right day - it's just taken me awhile to get the details here - sorry guys!


OMG TOTORO!!! Seriously, if you can't find anything charming about Miyazaki or anything else from Studio Ghibli, you have no heart. My Neighbor Totoro is a fave of mine, but the dust sprites are also featured in my other fave Spirited Away. Yes people - two movies in one mani - can I collect extra points? Anyway...

I started with a base of OPI My Vampire Is Buff.


Next I freehanded the soot sprites with Essie Licorice (black) and Sally Hansen White On. Totoro is Misa Paint My Nails @Work, Licorice, White On and Sally Hansen In the Groove (green).
I stamped the stars using pieces of an image from VividLacquer 014 and used In the Groove, Sally Hansen Brisk Blue and Sally Hansen Presto Pink.

I was absolutely gleeful with the way this turned out! I don't do 'cutsie' very often, but I'll always make an exception for Totoro.

-L


Tuesday, 23 September 2014

31DC2014 Day 22 - Inspired by a Song

yup - I started skipping again. I was very, very busy this weekend doing ALL kinds of nail art things, but you'll have to wait to hear about that later...

My song inspiration is I'm A Survivor by Destiny's Child.
My bf DJ's and I guarantee he will play a handful of Beyonce/Destiny's Child songs at EVERY. GIG. How can I not love him for that?!?


I remember in the video they were on the beach in these sexy camo outfits, so I turned to our very own CANVAS lacquer G.I.Jane for my base (available now at our Etsy shop).
With a detail brush I freehanded the camo splotches using Misa Paint My Nails @Work, Maybelline Color Show Bold Gold and a few black accents in Essie Licorice.


I originally intended to stamp a camo print in gold from a Vivid Lacquer plate, but my friend had borrowed it so I improvised instead. I think a gold stamped camo would have turned out very different, more GLAMO (get it, glamorous camo!) but I still like my rustic rando version. And it does mean another camo mani is to come in the future!

-L

My Grade-est Hit! 31DC2014, Day 10 - Gradients

Oh god, nail puns! hahahaha

I just had to.

Today I present to you my greatest Instagram hit - my newly dubbed "crossover gradient".  I do gradients ALL the time, so for this prompt in the challenge I really wanted to go above and beyond.

crossover gradient
Yay! This look got almost 250 likes, and one of them was the Nailasaurus! I def fan-girl squee'd when I saw that!

I started with a base of Zoya Brigitte. On my thumb, index and pinky I used a reinforcement sticker for my half moons, and a french manicure guide for the upper half. I've done and seen many half moon gradients before, and when I've seen double gradients Simply Nailogical has dubbed them 'scaled gradients', but those typically use craft tape to create a, well, scaled look with interesting shapes cut into the tape. I'm not sure this is a scaled gradient since it adheres to the half moon look.
The deepest purple in the gradient is Misa Sorry Just Can't Help It, then Zoya Odette and Zoya Rue.


The same gradient was used on my middle and ring finger over a french guide. When that was dry I went over it in the opposite direction, being sure to use a shade that would allow the previous gradient to be visible. This took a very light hand. I used OPI Don't Bossa Nova Me Around and Zoya Rue. Then for the hell of it I threw on Cirque Iris on my index and pinky for some shimmer.

I can't wait to try this technique again with different shades!!! Please let me know if you try a crossover gradient for yourself!

-L

Wednesday, 10 September 2014

31DC2014, Day 7 - Black & White

Heyo!

Day 7 - Black & White

I feel like I really stretched my creative muscle on this one!


This is an ode to old film! I tried to create a vintage vignette look with a radial gradient. I'd say it was semi-successful - my collection is really lacking the perfect grey.
I started with a base of Sally Hansen White On, then used CoverGirl Silver Lining, Misa Paint My Nails @Work and Essie Licorice.


I gotta give props to VividLacquer 021 for making this mani possible! What an awesome image plate.

-L

31DC2014, Day 5 - Blue

Hello!

Day 5 - Blue

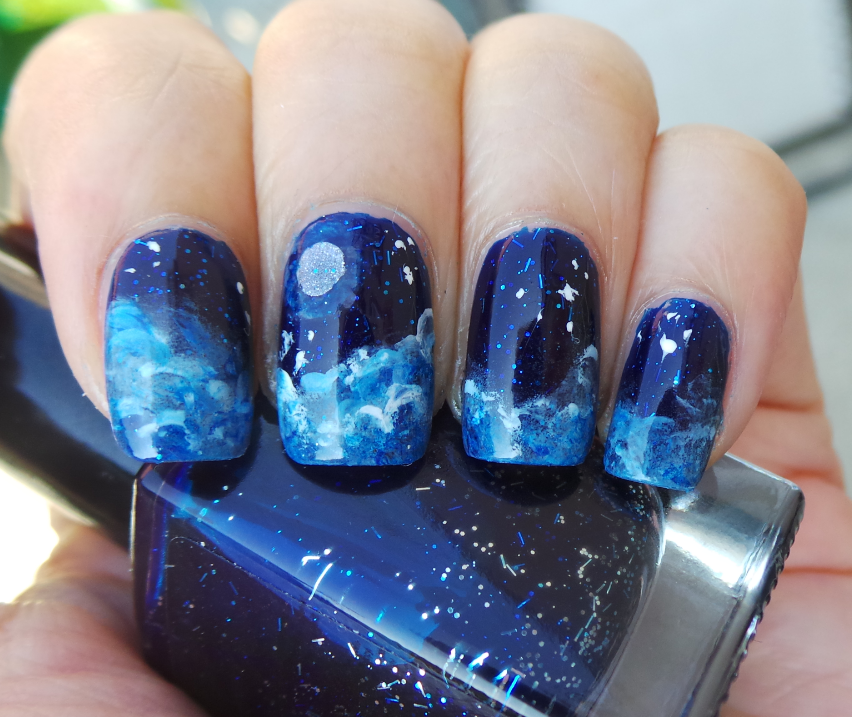
So far one of my most popular Instagram posts ever! I loved how this turned out and was so sorry to have to take it off!


Whoo! This was NOT a lazy interpretation, but it didn't take hours either. The base is Cirque Tibetan Nights, a fave blue, but damn does it stain! The clouds were freehanded using a combination of bondi blue skies, Misa Blue Over a Boy, bondi nyc NYPD and a bit of Sally Hansen White On for highlights and stars.


The moon I stamped since I didn't trust myself to freehand a circle! I used Konad Silver and VividLacquer 017.

Sometimes I impress myself.

-L

Wednesday, 27 August 2014

Colour Blocking and Holo Tape

Hello!

This look is a bit different for me since I very rarely use anything but actual nail polish in my manis (I don't use acrylic paints, studs, stickers, etc., not that there's anything wrong with any of those!)


I was at my local Shoppers (Drug Mart, for those of you unfamiliar with the Canadian chain), and saw a clearance bin with nail art stickers by Essence. As I said, I don't use stickers much, but I liked the holographic tape. This is a bit thicker and wider than your usual metallic striping tape (and therefore much easier to handle). It comes on a flat sheet (not a roll), so they're shorter strips. I think I got 3 or 4 nails done with each strip.

I started with 2 coats of bondi nyc Lady Liberty (seafoam). I waited a good while for that to dry, taped off the tops and added Misa Sorry Just Can't Help It (purple). Then added the tape across the border. Not only does it look great, but it hides a few of the imperfect lines!

I actually matted (Essie Matte About You) all but my ring finger after top coating (Seche Vite) . This photo is a bit out of focus, but shows off the different finishes better.


Which are you, shiny or matte?

-L

Monday, 11 August 2014

A Rip in Time & Space

Hello!

Sorry it's been awhile. A few different things have been keeping me busy the last couple weeks, but it's all been good!

A couple weeks ago I did this mani, and for the first time tagged myself into a trending theme. This thread was started by The Nail Art Guild, a small group of nail bloggers I follow on Instagram. I'm happy to say this mani has gotten more likes than I've ever received before! For a newbie like myself, hitting just over 100 likes (about 105 last count), is very thrilling!


This theme was Time & Space, so I decided to interpret a wormhole, a rip in the space-time-continuum.

nebula, before the rip
I actually freakin' love this nebula look before I added extra streaks and sparks - but it didn't represent the theme well enough for me so I had to take it to that next level. However, next straight-up galaxy mani I do HAS to have a nebula like this!

I started with a black base of Essie Licorice. Then with a makeup sponge I did a bit of a circle gradient plus random spots with Sally Hansen White On, bondi nyc Blue Skies, Misa Blue Over a Boy, China Glaze Orange Knockout, Misa A Sunny Smile Makes Me Go Wild and bondi nyc Fuschia-istic. Using a few of those colours I also took a detail brush and drew light outward streaks from a centre point - the tiny dot is actually Dance Legend New Prisms Optical Illusion.

wormhole mani!

I continued to add the coloured streaks, added a few light black streaks on top of the colour for dimension, and a few white spots. To soften the look I added little splotches of white and grey in the form of Nfu-Oh Jelly Syrup 01 & 04. Topped with KBShimmer I Only Have Ice For you and a coat of Cult Nails Wax That (after Seche Vite, of course).

I'm so proud of these results that I plan on tagging myself into more themes in the future!

-L

Thursday, 24 July 2014

Sun Gradient Pre-Stamp

Hello!

So you know how I'm always forgetting to photograph my bases before I do additional art?
Well I was so happy with today's gradient pre-stamp that it's getting it's own post (and day of public wear) before I add art!


So I've done plenty of linear gradients, pie gradients, and now this is my first circle gradient. I didn't intend it to look so solar, but here we are.
I used Misa A Sunny Smile Makes Me Go Wild (yellow), Quo by Orly Femme Fatale (pink) and Nails Inc Baker Street (blue), all on top of a base of two coats of OPI My Vampire Is Buff. Had I done 3 coats I probably wouldn't have revealed that ridge on my ring finger. Oh well!

Now the big decision is what will happen next... Tune in for the finale!

-L

Wednesday, 16 July 2014

Surreal Garden with Dragonflies

Hello!

Today's look could have been two separate manis. I wasn't sure what I was doing exactly when I started, and even though I'm happy with both looks, they don't seem that cohesive.


I started off with a base of piCture pOlish Atomic. Some of you must be sick of hearing what I use as a base since it seems it always gets covered up anyway! I'm often intending for some of the qualities of the base polish to shine though, but it rarely turns out that way.

pre clean up and stamp
On my thumb, index and middle finger I used a combination of sponging and dry brush technique for this ethereal look. Polishes are Misa Lash Out, Motives Tahiti Surf, Misa Let's Go Green, and Elevation Polish Wuyi Mountain. On my ring and pinky, with the same techniques, I used Duri What a Keeper, Elevation Polish El Cap, Cirque Vaudeville and Cadillacquer Pinkman.


The grass is from Vivid Lacquer plate 14 and the dragonflies and stars are from plate 19. The flowers are from Konad plate m53. I love the surreal garden, and the whimsical dragonflies, but they don't necessarily work together do they? What do you think?

Bonus macro to show off some shimmer:


Pretty Shimmering Pie Floral

Hello!

After making a conscious decision to use more holos, I've now decided I need to give more of my shimmers some shine.


I used Elevation Polish Limestone as my base. In the macro below you can see hints of the gold flakes shine through the gradient. The 'pie' gradient is made up of Elevation Polish El Cap (bluish purple), Duri Showstopper (pink) and Misa Let's Go Green (green, duh).

shimmery 'pie' gradient pre-stamp

The flower image is from Bundle Monster 220 and I used OPI Eurso Euro and Live.Love.Carnival.

...and here's a bonus macro that our Instagram followers seemed to enjoy.


-L

Thursday, 26 June 2014

Glow In The Dark Jellyfish

Hello!

I haven't done freehand stuff in awhile - so here we go!


I wish I had taken a photo of the subtle blue "sea". It looked pretty cool and I will probably do something similar again. I started with 2 coats of bondi NYC Midnight Mystery. I dabbed on bondi NYC NYPD, Misa Blue Over A Boy and Quo by Orly Prepster.


I didn't think of using glow in the dark polish until the very last second, detail brush in hand. I dug into the CANVAS lacquer stash and used Beyond the Wall, one of our best sellers. I also used Serum No 5 Skylights, another glow polish, to layer the glow power. With my Quo by Orly Instant Artist polishes in Black and White, I tried to add some outline details using the bottle brushes. For added shimmer I layered a bit of Misa Candy Girl. In person the jellyfish shimmer and sparkle so much more, I wish it had translated.


Yes, it's a crappy photo - but you get the gist of it right?

I know I still need to work on my freehand skills, but I wouldn't call this a fail. I also think I may try this again, but without limiting myself to glow polish.

-L

Tuesday, 10 June 2014

Rebecca Minkoff Inspired Tape Mani


Hello!

Today I bring you another Rebecca Minkoff inspired mani. (If you missed my previous Ode-to-a-bag, you can find it here)

MAC Daddy bag by Rebecca Minkoff inspired nails

I have been putting off this look for awhile because… I’m afraid of tape manis! Over the last couple months I’ve attempted a few, and they’ve been such a mess that they had to be scrapped right away! I am so proud to be sharing a successful one today.

I started with 3 coats of Misa A Sunny Smile Makes Me Go Wild, a neon highlighter yellow. On my ring finger is 2 coats of Misa Paint My Nails @Work (ha, love that name!) with a coat of Elevation Polish Huangshan. Everything topped with SV.


I waited for a good long while to make sure everything was really dry before adding the tape. I love the results! A Sunny Smile MMGW and Huangshan are such a perfect match aren’t they?


...and another sunny day pic!


Should I be trying more tape manis in the future??

-L

Sunday, 11 May 2014

Spongey Coloured Floral, Nails of the Day

Hello!

I thought about continuing with my monochrome theme, but the weather has been too nice not to do something more bright and summery.


I started with a base of a-England Encore Margot, a gorgeous silvery holo that has not been justice by my photos. I really wanted to see how cremes and a holo base would play together so I grabbed bondi nyc The Limelight (bright green), Essie Come Here (coral) and a blue Misa I can never remember the name of!

before the stamping
I quite like the look of this before the stamping. I really wish the holo translated better, it looks SO COOL in the sun, but I didn't get a chance for a photo.
I used a Pueen plate and Konad Gold Black for the flowers and dots.


I did my best to offset the stamping so I wouldn't cover up too much of the holo base and the sponged colours. I like the final result, and it matched my mood and the weather! I feel like there's got to be a dress or two out there that this would pair up perfectly with.

-L

Monochrome Blue, Nails of the Day

Continuing in the monochrome theme from my last mani, I decided to do something blue.


I wasn't really sure where I was going with this when I started. I grabbed a bunch of my blue cremes, a detail brush and went to work.
I started with a base of bondi nyc Blue Skies - for a fairly light colour I'd consider this an ALMOST one coater! With my detail brush I used a number of blues - and unfortunately I can't remember them all at the moment. I definitely used bondi nyc NYPD, and bondi nyc Midnight Mystery, which are deeper blues. I used a Misa for the lighter blue, but I can't remember what it's called. There may have been another shade or two but who knows!
I then stamped using a Pueen plate 46 and Konad Gold Black.


...and then I did this. Probably shouldn't have. I guess I just wanted to add some pizzazz and didn't know how to. So I put a coat of Quo by Orly Glam Trash (which I think is exactly like Orly Sparkling Garbage). It obscures the stamped image, and not in a good way.
The thing about overdoing, or messing up any mani, is that I change my nails so often that I don't let it bother me for very long. I'm always thinking about what I'll be doing next!

-L

Monday, 28 April 2014

Impressionist Floral, Nails of the Day


Hello!
I’ve really been on a floral kick lately! I think I’m trying to make up for the fact that the real flowers are a bit behind this year, due to such a cool spring.


I started with a taupe-y grey base of Misa Paint My Nails @Work (love the name!) I have no idea how old this is or from what collection it’s from, but here’s a swatch anyway (since I hardly swatch).


I used so many polishes for the flowers I couldn’t keep track of them all. The larger ‘roses’ and leaves were done with a tiny brush while the little orange flowers were done with a dotting tool.


I know not all bloggers paint their other hand as intricately, but I try -- I need the symmetry! But with this other hand I kept the colors slightly more muted, I can’t decide which I like better!

the rarely seen right hand!

…and a bonus pic.


-L

Sunday, 30 March 2014

Stamped Vertical Gradient, Nails of the Day

I love gradients. For some reason I find doing them vertically more challenging than horizontally, but I love the effect! I usually use cremes, and I've tried holos once or twice, but I've never used all shimmers, and I'm quite pleased with the result.
Because it has a slightly metallic finish, at a glace it almost looks like I could be wearing foils (which I have yet to try even though I picked up a Ciate kit from Winners a couple months back).

vertical stamped gradient, notd
Unfortunately there's some tipwear since this is day 3 with this mani (my day of photos were a bit messy, the clean up on this was a real pain). In lower lighting this sometimes looks like it's a multichrome polish, shifting with the curve of the nail - love it!

I used a base of CoverGirl 'Silver Lining'. I like using it as a base for a lot of nail art, such as my Monet mani.  It's not too grey or too metallic, it's closer to a shimmery off-white if you ask me, which I prefer to a stark white.
For the gradient I used Misa 'Let's Go Green', China Glaze 'Frostbite' and Nyx 'Purple'.
I then stamped using VividLacquer plate 019 with Konad 'Gold Black'. In the bottle this appears quite shimmery, but it almost never translates onto the nail, so it's pretty much my go-to black stamping polish.

Anyone else find vertical gradients harder than horizontal, or is that just me?

-L